
0. 前言
在部署深度学习模型时需要用到TensorRT,看了一遍文档后,我发现对于初学者来说,官方文档实在是太晦涩。文档里既没有接口的应用示例,也没有及时更新新接口的用法。在翻阅了部分博客和TensorRT仓库源码后,才有了本文。
TensorRT是NVIDIA推出的用于深度学习推理的高性能引擎,旨在优化深度神经网络模型的推理速度和性能。TensorRT可以通过层融合、混合精度、量化等技术显著提高深度神经网络的推理性能。
![]()
NVIDIA提供了TensorRT的C++和Python API,这里主要介绍Python API的一些用法。
1. TensorRT的安装
在安装TensorRT前,首先确保已经安装了CUDA和cuDNN。然后根据CUDA的版本在 下载页面 下载对应的TensorRT安装包。
不过貌似最新版本的TensorRT(8.6.1)支持从PyPI直接安装
pip install tensorrt
但是我只在Linux系统中安装成功了,Windows系统中安装失败,原因暂时不明。
1.1 Windows下的安装
Windows下需要使用Zip文件安装,根据 文档中 Zip File Installation 章节,下载zip包后:
-
将压缩包内文件解压后,复制到
C:\Program Files\NVIDIA GPU Computing Toolkit\TensorRT\v8.x.x.x下。安装路径随意选择。 -
配置环境变量,将
<安装路径>/lib和<安装路径>/bin添加到环境变量中。 -
安装python包,进入
<安装路径>/python目录,执行如下命令:pip install tensorrt-8.x.x-cp3x-none-win_amd64.whl
1.2 Linux下的安装
Linux下的安装比较简单,根据 文档中 Tar File Installation 章节,下载tar包后:
-
解压tar包,进入解压后的目录。
tar -xzvf TensorRT-8.x.x.x.Linux.x86_64-gnu.cuda-1x.x.tar.gz cd TensorRT-8.x.x.x -
添加环境变量
vim ~/.bashrc export LD_LIBRARY_PATH=$LD_LIBRARY_PATH:<安装路径>/lib export PATH=$PATH:<安装路径>/bin source ~/.bashrc -
安装python包
cd TensorRT-8.x.x.x/python
pip install tensorrt-8.x.x.x-cp3x-none-linux_x86_64.whl
2. 推理前的准备
TensorRT有自己的一套推理流程,我们在使用PyTorch或TensorFlow导出模型权重后,需要进一步转换。
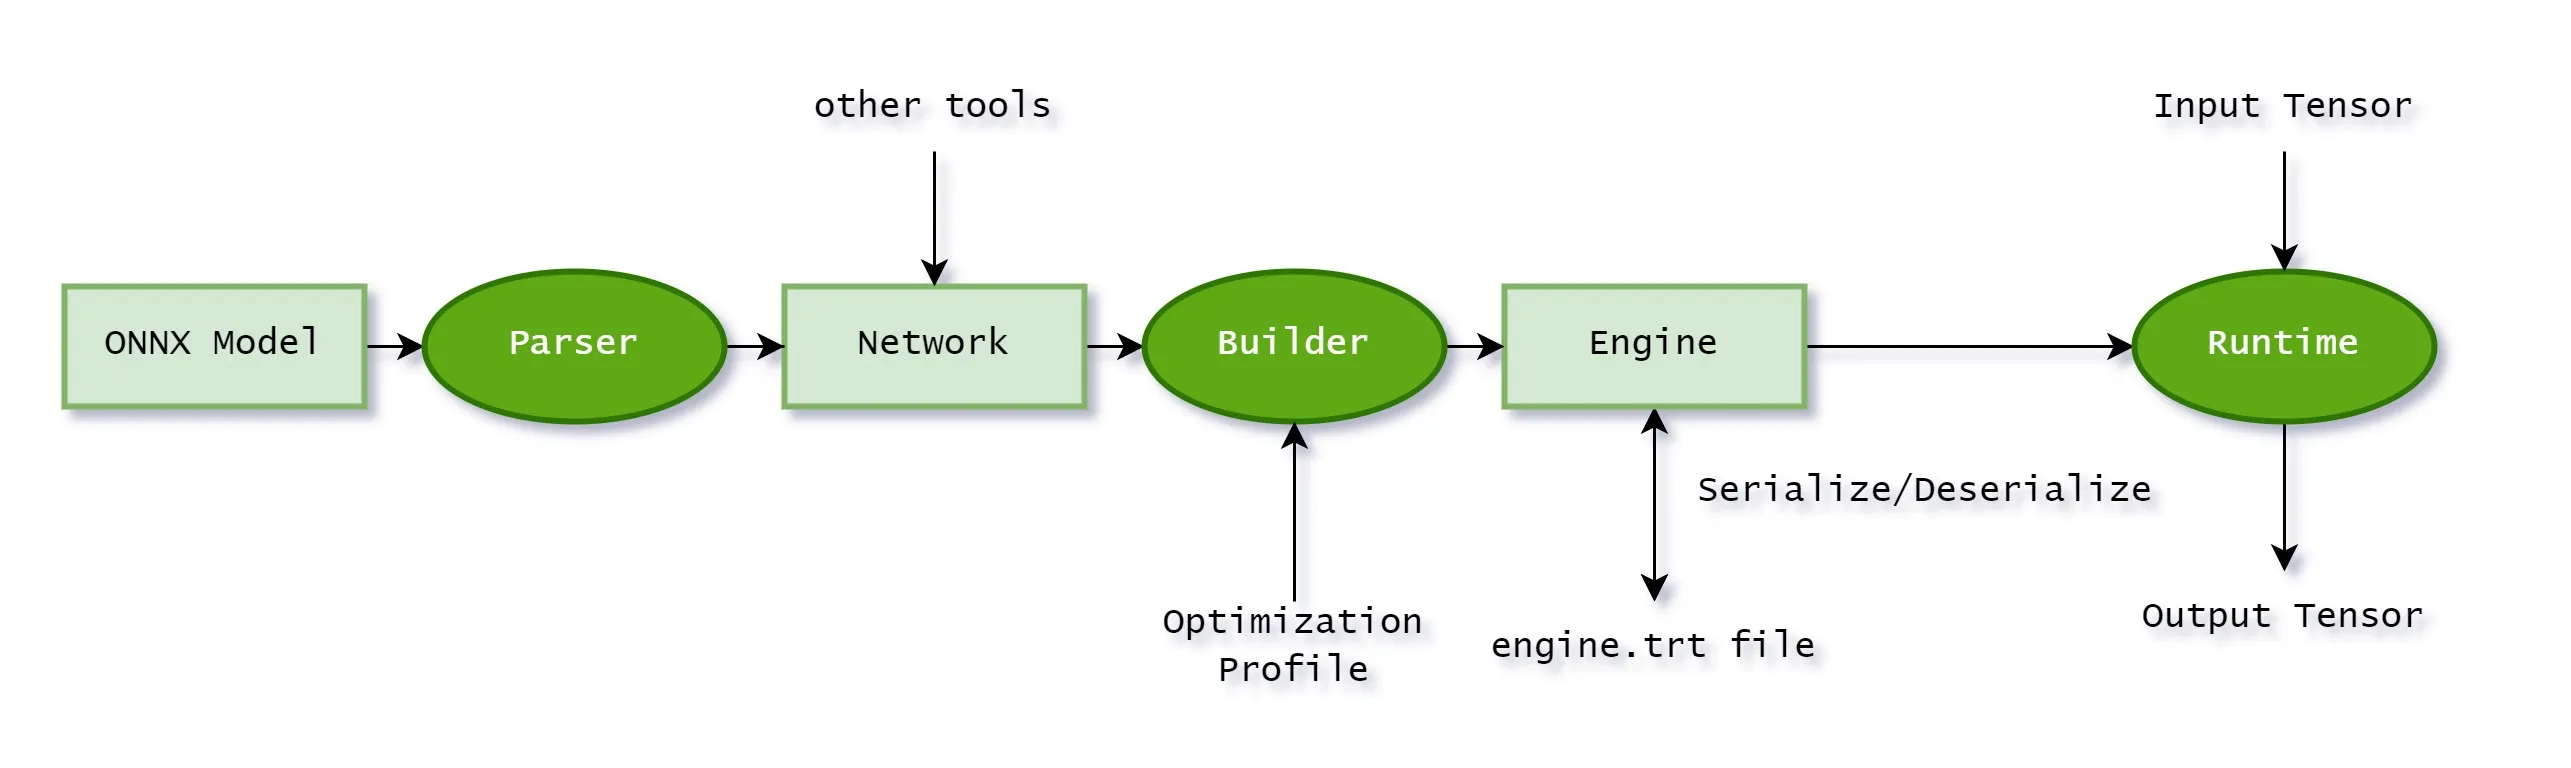
TensorRT最终需要的是一个TensorRT Engine,这个Engine是由TensorRT的Builder构建,而Builder需要一个TensorRT Network。TensorRT Network是由TensorRT Parser解析的ONNX模型构建的。
当然,也有一些针对特定框架直接导出TensorRT Engine的工具,例如 torch2trt、 TF-TRT 等等,这里我用了更通用的方法,即先导出ONNX模型,再转换为TensorRT Engine。
我们还需要安装如下依赖,以备后续使用:
pip install onnx onnxruntime pycuda
2.1 导出ONNX模型
对于PyTorch模型,可以使用 torch.onnx.export 导出ONNX模型。
import torch
from model import Model

model = Model()
model.load_state_dict(torch.load('model.pth'))
model.eval()

dummy_input = torch.randn(1, 3, 224, 224)
torch.onnx.export(model, dummy_input, 'model.onnx', verbose=True)
对于TensorFlow模型,可以使用 tf.saved_model.save 导出SavedModel,再使用 tf2onnx 将SavedModel转换为ONNX模型。
import tensorflow as tf
import tf2onnx
import onnx
from model import Model

model = Model()
model.load_weights('model.h5')
model.compile()

input_signature = [tf.TensorSpec([3, 3], tf.float32, name='x')]
# Use from_function for tf functions
onnx_model, _ = tf2onnx.convert.from_keras(model, input_signature)
onnx.save(onnx_model, "dst/path/model.onnx")
2.2 转换为TensorRT Engine
为完成Engine的构建,我们需要完成的步骤有:
- 转换并填充Network对象;
- 编写构建配置对象(Config);
- 编写优化配置对象(Optimization Profile);
TensorRT 默认为我们提供了三种主流格式的转换器:UffParser、CaffeParser、OnnxParser,在本文中我们需要使用OnnxParser。
TensorRT 支持两种批处理模式:显式批处理(explicit batch)和隐式批处理(implicit batch)。假设网络的输入张量形状为(n, c, h, w),在隐式批处理模式下,网络只需要指定输入形状为(c, h, w),批次维度是隐式的,并且在运行时可动态指定;在显式批处理模式下,批量维度需要网络显示定义,甚至可以不用批量维度,对于动态批量大小的需求,可以使用Optimization Profile配置动态形状。隐式批处理由早期TensorRT使用,现在已经被弃用了,许多教程中你会发现代码中出现了builder.max_batch_size = 32这样的调用,这就隐式批处理的相关配置,现在已经不赞成使用。
为开启显示批处理,需要:
builder = trt.Builder(...)
builder.create_network(1 << int(trt.NetworkDefinitionCreationFlag.EXPLICIT_BATCH))
Optimization Profile支持配置网络输入的动态形状,比如动态批次大小、动态图像输入大小。为实现动态形状输入,我们需要指定输入张量的三个形状配置:最小尺寸、最优尺寸、最大尺寸。
min_shape = (3, 100, 200)
opt_shape = (3, 150, 250)
max_shape = (3, 200, 300)
profile = builder.create_optimization_profile();
profile.set_shape("input", min_shape, opt_shape, max_shape)
config.add_optimization_profile(profile)
TensorRT支持设置多个优化配置文件,在运行时,需要设置优化配置文件,默认隐式选择配置文件0。你可以通过以下接口手动更改当前优化配置,需要注意的是,一个Engine可以有多个Context,但一个优化配置文件只能有一个Context。 优化配置文件的使用还有许多细节需要留意,更多请参考TensorRT文档 Working with Dynamic Shapes 章节
context.set_optimization_profile_async(0, stream)
有了以上基础,我们可以编写一个函数,将ONNX模型转换为TensorRT Engine。
import tensorrt as trt

TRT_LOGGER = trt.Logger(trt.Logger.INFO)

def GiB(val):
    return val * 1 << 30

# This function builds an engine from a onnx model.
def build_engine(onnx_file_path, precision = 'fp32', dynamic_shapes = None):
    """Takes an ONNX file and creates a TensorRT engine to run inference with"""

    EXPLICIT_BATCH_FLAG = 1 << int(trt.NetworkDefinitionCreationFlag.EXPLICIT_BATCH)

    builder = trt.Builder(TRT_LOGGER)
    network = builder.create_network(EXPLICIT_BATCH_FLAG)
    config = builder.create_builder_config()
    parser = trt.OnnxParser(network, TRT_LOGGER)

    # Parse model file
    TRT_LOGGER.log(TRT_LOGGER.INFO, f'Loading ONNX file from path {onnx_file_path}...')
    with open(onnx_file_path, 'rb') as model:
        TRT_LOGGER.log(TRT_LOGGER.INFO, 'Beginning ONNX file parsing')
        if not parser.parse(model.read()):
            for error in range(parser.num_errors):
                TRT_LOGGER.log(TRT_LOGGER.ERROR, parser.get_error(error))
            raise ValueError('Failed to parse the ONNX file.')
    TRT_LOGGER.log(TRT_LOGGER.INFO, 'Completed parsing of ONNX file')
    TRT_LOGGER.log(TRT_LOGGER.INFO, f'Input number: {network.num_inputs}')
    TRT_LOGGER.log(TRT_LOGGER.INFO, f'Output number: {network.num_outputs}')


    if dynamic_shapes is not None:
        # set optimization profile for dynamic shape
        profile = builder.create_optimization_profile()
        for i in range(network.num_inputs):
            input = network.get_input(i)
            min_shape = dynamic_shapes['min_shape']
            opt_shape = dynamic_shapes['opt_shape']
            max_shape = dynamic_shapes['max_shape']
            profile.set_shape(input.name, min_shape, opt_shape, max_shape)
        config.add_optimization_profile(profile)

    # We set the builder batch size to be the same as the calibrator's, as we use the same batches
    # during inference. Note that this is not required in general, and inference batch size is
    # independent of calibration batch size.
    config.set_memory_pool_limit(trt.MemoryPoolType.WORKSPACE, GiB(1)) # 1G

    if precision == 'fp32':
        pass
    elif precision == 'fp16':
        config.set_flag(trt.BuilderFlag.FP16)
    elif precision == 'int8':
        config.set_flag(trt.BuilderFlag.INT8)
    else:
        raise ValueError('precision must be one of fp32, fp16, or int8')

    # Build engine.
    TRT_LOGGER.log(TRT_LOGGER.INFO, f'Building an engine from file {onnx_file_path}; this may take a while...')
    serialized_engine = builder.build_serialized_network(network, config)
    TRT_LOGGER.log(TRT_LOGGER.INFO, 'Completed creating Engine')
    return serialized_engine
3.3 保存TensorRT Engine
序列化和反序列化TensorRT Engine的代码如下:
def save_engine(engine, path):
    TRT_LOGGER.log(TRT_LOGGER.INFO, f'Saving engine to file {path}')
    path = Path(path)
    path.parent.mkdir(parents=True, exist_ok=True)
    with open(path, 'wb') as f:
        f.write(engine)
    TRT_LOGGER.log(TRT_LOGGER.INFO, 'Completed saving engine')

def load_engine(path):
    logger.info(f'Loading engine from file {path}')
    runtime = trt.Runtime(logger.TRT_LOGGER)
    with open(path, 'rb') as f:
        engine = runtime.deserialize_cuda_engine(f.read())
    logger.info('Completed loading engine')
    return engine
3. 使用TensorRT进行推理
上文中提到了网络输入张量支持动态形状,同样的,输出张量也支持动态形状,比如网络输出形状由网络输入形状决定,为此,我们需要编写一些分配内存的策略。 在内存分配上,我们需要一点CUDA编程相关的知识,具体来说,使用pycuda分配内存(实际上更建议使用cudart)。在CUDA内存模型中,Host指电脑主机,Device指NVIDIA显卡。
我们需要派生IOutputAllocator类,然后实现自己的reallocate_output和notify_shape方法。reallocate_output中可以实现的内存分配方案很灵活,这里使用的是每次都重新申请内存,显然这样是不优的,这样做的好处是代码量少,另一些可选的方案有:
- 预分配足够大的内存,可以使用
context.get_max_output_size(output_tensor_name)来获取优化配置文件中的最大字节数; - 重新利用上一次分配的内存空间,仅当空间不足时才重新分配;
- …
from collections import OrderedDict
import tensorrt as trt
import pycuda.driver as cuda
import numpy as np

class OutputAllocator(trt.IOutputAllocator):
    def __init__(self):
        # print("[MyOutputAllocator::__init__]")
        super().__init__()
        self.buffers = {}
        self.shapes = {}

    def reallocate_output(self, tensor_name: str, memory: int, size: int, alignment: int) -> int:
        # print("[MyOutputAllocator::reallocate_output] TensorName=%s, Memory=%s, Size=%d, Alignment=%d" % (tensor_name, memory, size, alignment))
        if tensor_name in self.buffers:
            del self.buffers[tensor_name]

        address = cuda.mem_alloc(size)
        self.buffers[tensor_name] = address
        return int(address)

    def notify_shape(self, tensor_name: str, shape: trt.Dims):
        # print("[MyOutputAllocator::notify_shape] TensorName=%s, Shape=%s" % (tensor_name, shape))
        self.shapes[tensor_name] = tuple(shape)
然后封装一个用于推理的类,该类提供一个 infer 接口,接收一个输入列表或字典,返回一个输出字典。列表和字典的值是numpy数组。当输入为列表时,列表中的元素将按顺序传入模型。为了顺利执行推理,我们需要在推理前将输入张量从host转移到device上,在推理后将输出张量从device转移到host上。基于index的张量方法已经被弃用,在新版本TensorRT中建议使用基于name的张量方法。
以下代码使用了异步方法,需要用到cuda stream,关于cuda stream的概念和用法,可以参考CUDA文档 Streams 章节
from collections import OrderedDict
from typing import Dict, OrderedDict, List, Union
import tensorrt as trt
import numpy as np
import pycuda.driver as cuda
import pycuda.autoinit

def get_input_tensor_names(engine: trt.ICudaEngine) -> list[str]:
    input_tensor_names = []
    for binding in engine:
        if engine.get_tensor_mode(binding) == trt.TensorIOMode.INPUT:
            input_tensor_names.append(binding)
    return input_tensor_names

def get_output_tensor_names(engine: trt.ICudaEngine) -> list[str]:
    output_tensor_names = []
    for binding in engine:
        if engine.get_tensor_mode(binding) == trt.TensorIOMode.OUTPUT:
            output_tensor_names.append(binding)
    return output_tensor_names

class ProcessorV3:
    def __init__(self, engine: trt.ICudaEngine):
        # # 选择第一个可用的 GPU 设备
        # device = cuda.Device(0)
        # # 将所选设备设置为当前活动的上下文
        # self.cuda_context = device.make_context()
        # self.cuda_context.push()

        self.engine = engine
        self.output_allocator = OutputAllocator()
        # create execution context
        self.context = engine.create_execution_context()
        # get input and output tensor names
        self.input_tensor_names = get_input_tensor_names(engine)
        self.output_tensor_names = get_output_tensor_names(engine)
        # create stream
        self.stream = cuda.Stream()
        # Create a CUDA events
        self.start_event = cuda.Event()
        self.end_event = cuda.Event()

    # def __del__(self):
    #     self.cuda_context.pop()

    def get_last_inference_time(self):
        return self.start_event.time_till(self.end_event)

    def infer(self, inputs: Union[Dict[str, np.ndarray], List[np.ndarray], np.ndarray]) -> OrderedDict[str, np.ndarray]:
        """
        inference process:
        1. create execution context
        2. set input shapes
        3. allocate memory
        4. copy input data to device
        5. run inference on device
        6. copy output data to host and reshape
        """
        # set input shapes, the output shapes are inferred automatically

        if isinstance(inputs, np.ndarray):
            inputs = [inputs]
        if isinstance(inputs, dict):
            inputs = [inp if name in self.input_tensor_names else None for (name, inp) in inputs.items()]
        if isinstance(inputs, list):
            for name, arr in zip(self.input_tensor_names, inputs):
                self.context.set_input_shape(name, arr.shape)

        buffers_host = []
        buffers_device = []
        # copy input data to device
        for name, arr in zip(self.input_tensor_names, inputs):
            host = cuda.pagelocked_empty(arr.shape, dtype=trt.nptype(self.engine.get_tensor_dtype(name)))
            device = cuda.mem_alloc(arr.nbytes)

            host[:] = arr
            cuda.memcpy_htod_async(device, host, self.stream)
            buffers_host.append(host)
            buffers_device.append(device)
        # set input tensor address
        for name, buffer in zip(self.input_tensor_names, buffers_device):
            self.context.set_tensor_address(name, int(buffer))
        # set output tensor allocator
        for name in self.output_tensor_names:
            self.context.set_tensor_address(name, 0) # set nullptr
            self.context.set_output_allocator(name, self.output_allocator)
        # The do_inference function will return a list of outputs

        # Record the start event
        self.start_event.record(self.stream)
        # Run inference.
        self.context.execute_async_v3(stream_handle=self.stream.handle)
        # Record the end event
        self.end_event.record(self.stream)

        # self.memory.copy_to_host()

        output_buffers = OrderedDict()
        for name in self.output_tensor_names:
            arr = cuda.pagelocked_empty(self.output_allocator.shapes[name], dtype=trt.nptype(self.engine.get_tensor_dtype(name)))
            cuda.memcpy_dtoh_async(arr, self.output_allocator.buffers[name], stream=self.stream)
            output_buffers[name] = arr

        # Synchronize the stream
        self.stream.synchronize()

        return output_buffers
使用示例:
inputs = {
  'image': np.array(...),
}

engine = load_engine(...)
processor = ProcessorV3(engine)

outputs = processor.infer(inputs)
4. 后记
有一个需要注意的地方,TensorRT生成的Engine是和硬件相关的,不同型号的显卡不能通用这个Engine。
当然,如果只是按照前文这种用法的话,体现不出使用TensorRT的优势。TensorRT的另一个功能是低精度推理,支持模型量化,但这又是另一个体系庞大的故事了,这里先挖一个坑,以后慢慢填。
还有一点待优化的是,CUDA是支持多个Stream并行执行的,但是上述代码并没有体现这一点,这个作为CUDA编程的一个坑,先留一下。